HOW TO DESIGN A YOUNG GIRL'S BEDROOM
When designing a bedroom for a young girl, the pressure is on. In fact, she might just be your trickiest client!
We should probably accept from the off that this project is quite different from decorating a nursery. It’s no longer a case of simply pleasing yourself. We need to think about what is going to be a hit with her.
So we need a plan. There’s a lot riding on this!
I’m going through this right now, designing a bedroom for my daughter. I have a process in place that has got me feeling pretty confident about it. I know what’s going in the room and where, and I can see how all the elements will work together.
Plus, I’ve got my little girl on board with the ideas too! Yep, that’s me doing a little happy dance.
Read on to see how I got there…it’s easy, I promise.
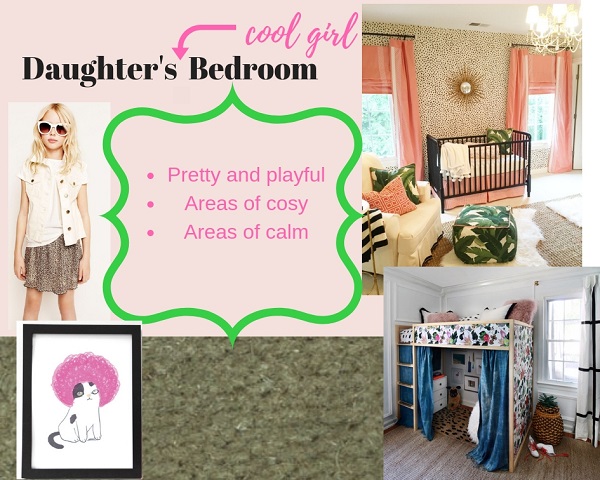
The mood board cements the fun, playful and pretty vibe in my mind. Ignore the cot!
VIEW YOUR YOUNG GIRL AS ‘THE CLIENT’ FOR THE BEDROOM
Kind of. You’re the client, too, of course - paying the bills etc - but to make this bedroom a success, we’ll have to consider what she is going to love.
A good place to start is to really think about what your little one is like. What does she enjoy doing? Has she developed any kind of style? What’s her personality? Is she in to anything in particular?
For my daughter, this looked something like this:
She’s lively, fun and outgoing
But also loves to get cosy and snuggle
She’s into cats (but is never getting one….shhh!)
She loves pink
She’s outgrowing babyish designs and toys
She loves to read, draw and write
From this, I have a brief to guide me: I’m aiming to create a pretty and playful bedroom that includes cosy spots and opportunities for calm. The vibe should be more cool than cutesy.
I created the mood board above to really cement these ideas. More on how I did that later.
PLAN THE BEDROOM LAYOUT
This is the stage I do first and it’s where you can work out where all the furniture will fit best. Doing this step on paper first means you won’t be dragging furniture from place to place later to find the best spot. It will also stop you realising too late that there just isn’t the space for that wardrobe you love (if you want to be able to open the doors, that is!).
To plan the room layout, I get quite basic. Out comes the ruler, pencil and graph paper. A new addition to my toolkit is blue/white tack.
You can see here how basic I’m talking, but it does the job. Nothing fancy needed!
This is what I do, step-by-step
Measure the room
Work out a scale for drawing the room on to the graph paper. For example, one tiny square could be equal to 20cms.
Draw and then cut out furniture to scale - and by that I mean the floor space it takes up. I find the measurements online for anything I have my eye on.
Play about with various positions and layouts, using the blue/white tack to keep the loose ‘furniture’ pieces in place (I’ve found they can quite easily get lost down the back of the sofa or similar, if not)
Think to myself, ‘I’m so glad I’m doing this on paper first! How did I ever think that bed would fit there?!’
CREATE MOOD BOARDS
Here's where it gets a little bit fancier - creating mood boards.
Creating a mood board of your plans for the bedroom will help you make sure that various elements and colours look good together. You can sometimes get a good idea in your head, but it’s even better to confirm that with a visual.
Also, creating a mood board helps you get ideas out of your head and into a format that you can show to others, in particular your little girl.
I create mood boards in an online tool called Canva. I first discovered it when looking for something to help me create online graphics for my blog. It’s easy to use, and it’s free, so nothing really stopping you from giving it a try.
Here’s a breakdown of what I do:
First up, I find images online of the things I’m planning to incorporate, from paint and carpets to furniture and decoration, and save them into a folder. I use Google image searches and Pinterest for inspiration images and product shots from retailer websites for furniture.
I then upload them into Canva,
I open a blank design in Canva (or re-save one of my existing files) and drag and drop my images, resizing and playing around with their position to get a good idea.
I do a separate file for each of the four walls. If you like, you could also get really detailed with a plan for an individual element.
The view seen when first walking through the bedroom door
View of one wall with the furniture and fun gallery wall.
When you’re happy with your mood boards, it’s time to show them to your little girl. Mine passed with flying colours. I think it’s because she could see it looked good, and therefore stopped her going to a position of just wanting EVERYTHING TO BE PINK!
Now all that I have to do is buy everything and get decorating! I’ll do a reveal post when it’s ready.
But back to you and your project. Are you up for giving this a go? It might sound a bit full-on, but it really does help to make you confident in your plans. I also find it really fun - it’s not that often you get to cut and stick these days, right?
I’ve even made you a little checklist :)
WHAT YOU’LL NEED
Tape measure
Graph paper
Ruler
Pencil
Scissors
Blue/white tack
Canva account - it’s free
Pinterest account (optional) - also free
And that’s it. Let me know in the comments if you give it a try!
Oh, and if you’re finding yourself stuck choosing colours, take a look at my post with easy ways to pick colours you’ll love.
Victoria x
PIN FOR LATER


